
DIY Mushrooms
Thanks to everyone who came to Sarah Gabriel’s home for the 2013 Homegrown Institute Mushroom Workshop. Brian and I were thrilled to share our knowledge with you folks and we wish you great success on your DIY mushroom endeavors!

As promised, here are some tips for how to get the most out of the three mushroom projects we covered. If I think of anything else, or if new questions come up, I’ll update this list:
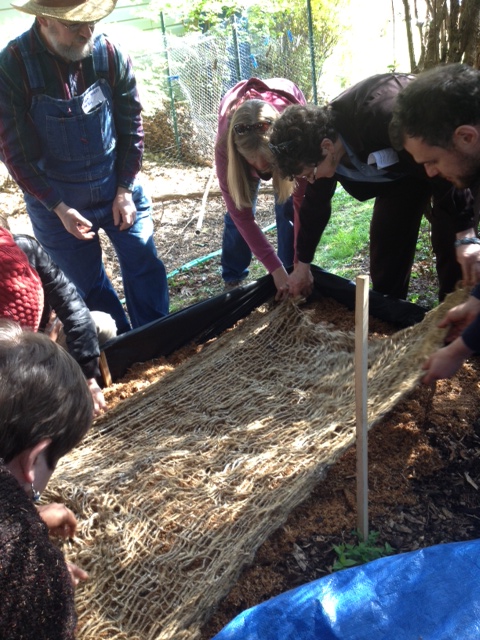
Stropharia Rugosoannulata Bed:
-best time to ensure proper mycelial “running” is to start your bed in the Spring or Fall. You can expect fruits during those same seasons.
-bed no deeper than 10″.
-you can dig some soil out or if you’re dealing with roots or don’t wanna tear up the top soil, you can build a retaining wall out of plastic or other material. This will help to hold in moisture around the edges of the bed, but is not essential.
-use pre-moistened hardwood woodchips that are not permeated with living mycelium or lots of mold. If you’re in doubt over the state of your woodchips, you can always pasteurize them in a 55 gallon drum, but for outdoor cultivation this is generally not necessary.
-if woodchips are large and there are lots of gaps between them, mix in some hardwood sawdust so the mycelium doesn’t have to expend extra energy “leaping” from chip to chip. Make your mycelium happy!
-Especially if you want fruits within the year, add a layer of moistened straw (salt hay works fine too, or even dried out grass clippings)
-Add your spawn in the approximate middle of the substrate. If it’s closer to 10″, I’d recommend a secondary layer closer to the surface. If you place it under the straw, it will colonize very quickly and work it’s way down.
-Spawn can be as simple as moving myceliated substrate from a wild patch into the bed. Other methods include cardboard spawn (spawned with wild myceliated substrate or grain spawn; anything you can spread out evenly), or pick up some jute spawn from us!
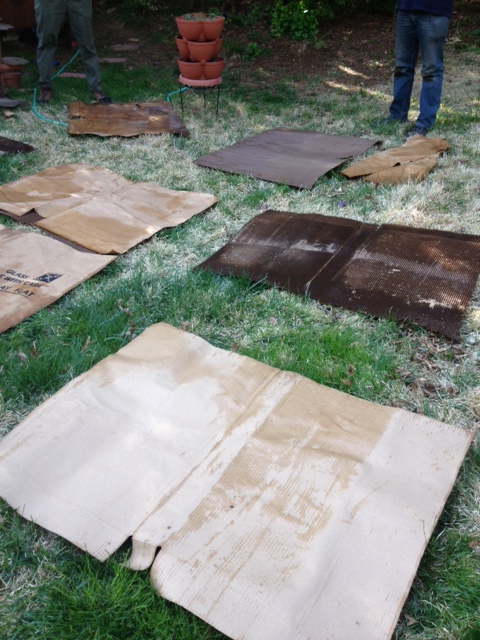
-To make cardboard spawn, strip glue and staples, soak the cardboard, then separate each sheet into two pieces- one of which has the intact corrugations. Spread you’re spawn around evenly, cover with the other piece, then place it in a trashbag with around 20 holes (pen-diameter sized) and keep this near room temperature. IMPORTANT: you’ll want to flip the bag over every other day to make sure water isn’t pooling in a particular spot, otherwise nasties will move in!
-Spawn is ready to add to the bed when it’s mostly colonized, meaning, when most of the cardboard is covered in visible, rhizomorphic (ropy, root-like) mycelium.
-keep your patch properly hydrated. The edges will dry out sooner, and straw will dry out sooner than woodchips. During the summer, water at night like you would vegetables to avoid spiking water temperature.
-When your mushrooms begin to grow, they may be visible only us pieces of the top layer of substrate poking up. Harvest before, or immediately after, the gills start to turn grayish. Gray means spores are starting to form and the fly larvae are not far off. A few larvae never hurt, extra protein as thy say!
-Woodchips will provide enough fodder for two years. Straw will be gone within a year. You may want to add more substrate every year or two to maintain your patch.
-I like slicing and roasting with plenty of olive oil, herbs and other vegetables, especially fennel.
-You can always let some of your mushrooms complete their growth cycle and drop their spores, updating your patch with fresh genetics!
-Remember stropharia is great for companion planting with crops, bioremediation, and bees!
Shitake Logs

-Oak works best, cherry and birch and basically any hardwood with persistent bark works well too. Bark holds in moisture and prevents other spores from germinating on the tender bits.
-Choose logs that are between 4″ and 8″ in diameter. You can certainly go bigger, but they’ll be harder to work with and will colonize slower. If you have oak stumps, consider inoculating with maitake plugs, in 3 years you’ll be glad you did! A true test of delayed gratification.
-Choose logs that have been freshly cut and show no signs of being colonized by mycelium- basically the wood and bark should look healthy. Spotty stuff on the bark like lichen is ok, as well as splochy black stuff which kind of looks like mildew. I recommend that you allow them to age til the green under the bark has faded. This could be a month during the warmer/wetter months, or over-winter. Don’t allow them to age too much or The best time to cut logs is late winter-early spring when the logs bulk up up to 40% with additional sugars- more fuel for the mycelium. There’s a secondary sap run which occurs in the fall when, I believe, the trees are moving those sugars down to their roots to provide energy to get them through the winter. Logs from any month will work, but if you can get logs that were cut during these special times, you’ll have better results.
-Cut the logs into manageable lengths. A log w/ 4″ diameter could be 5′, while one that’s 8″ might be tough to move at 3′ unless you’ve been working out with kettlebells.
-When you’re ready to inoculate your logs, heat up wax- cheese/bees wax works well, and I’m sure other food-grade waxes are OK as well as long as they can get to a high temperature. Heat your wax up in a double-boiler or better yet a crock pot until the wax starts to produce a little smoke. It’s important to get your wax up to temperature, otherwise it may flake off the log. Wax is not essential, but I recommend it.
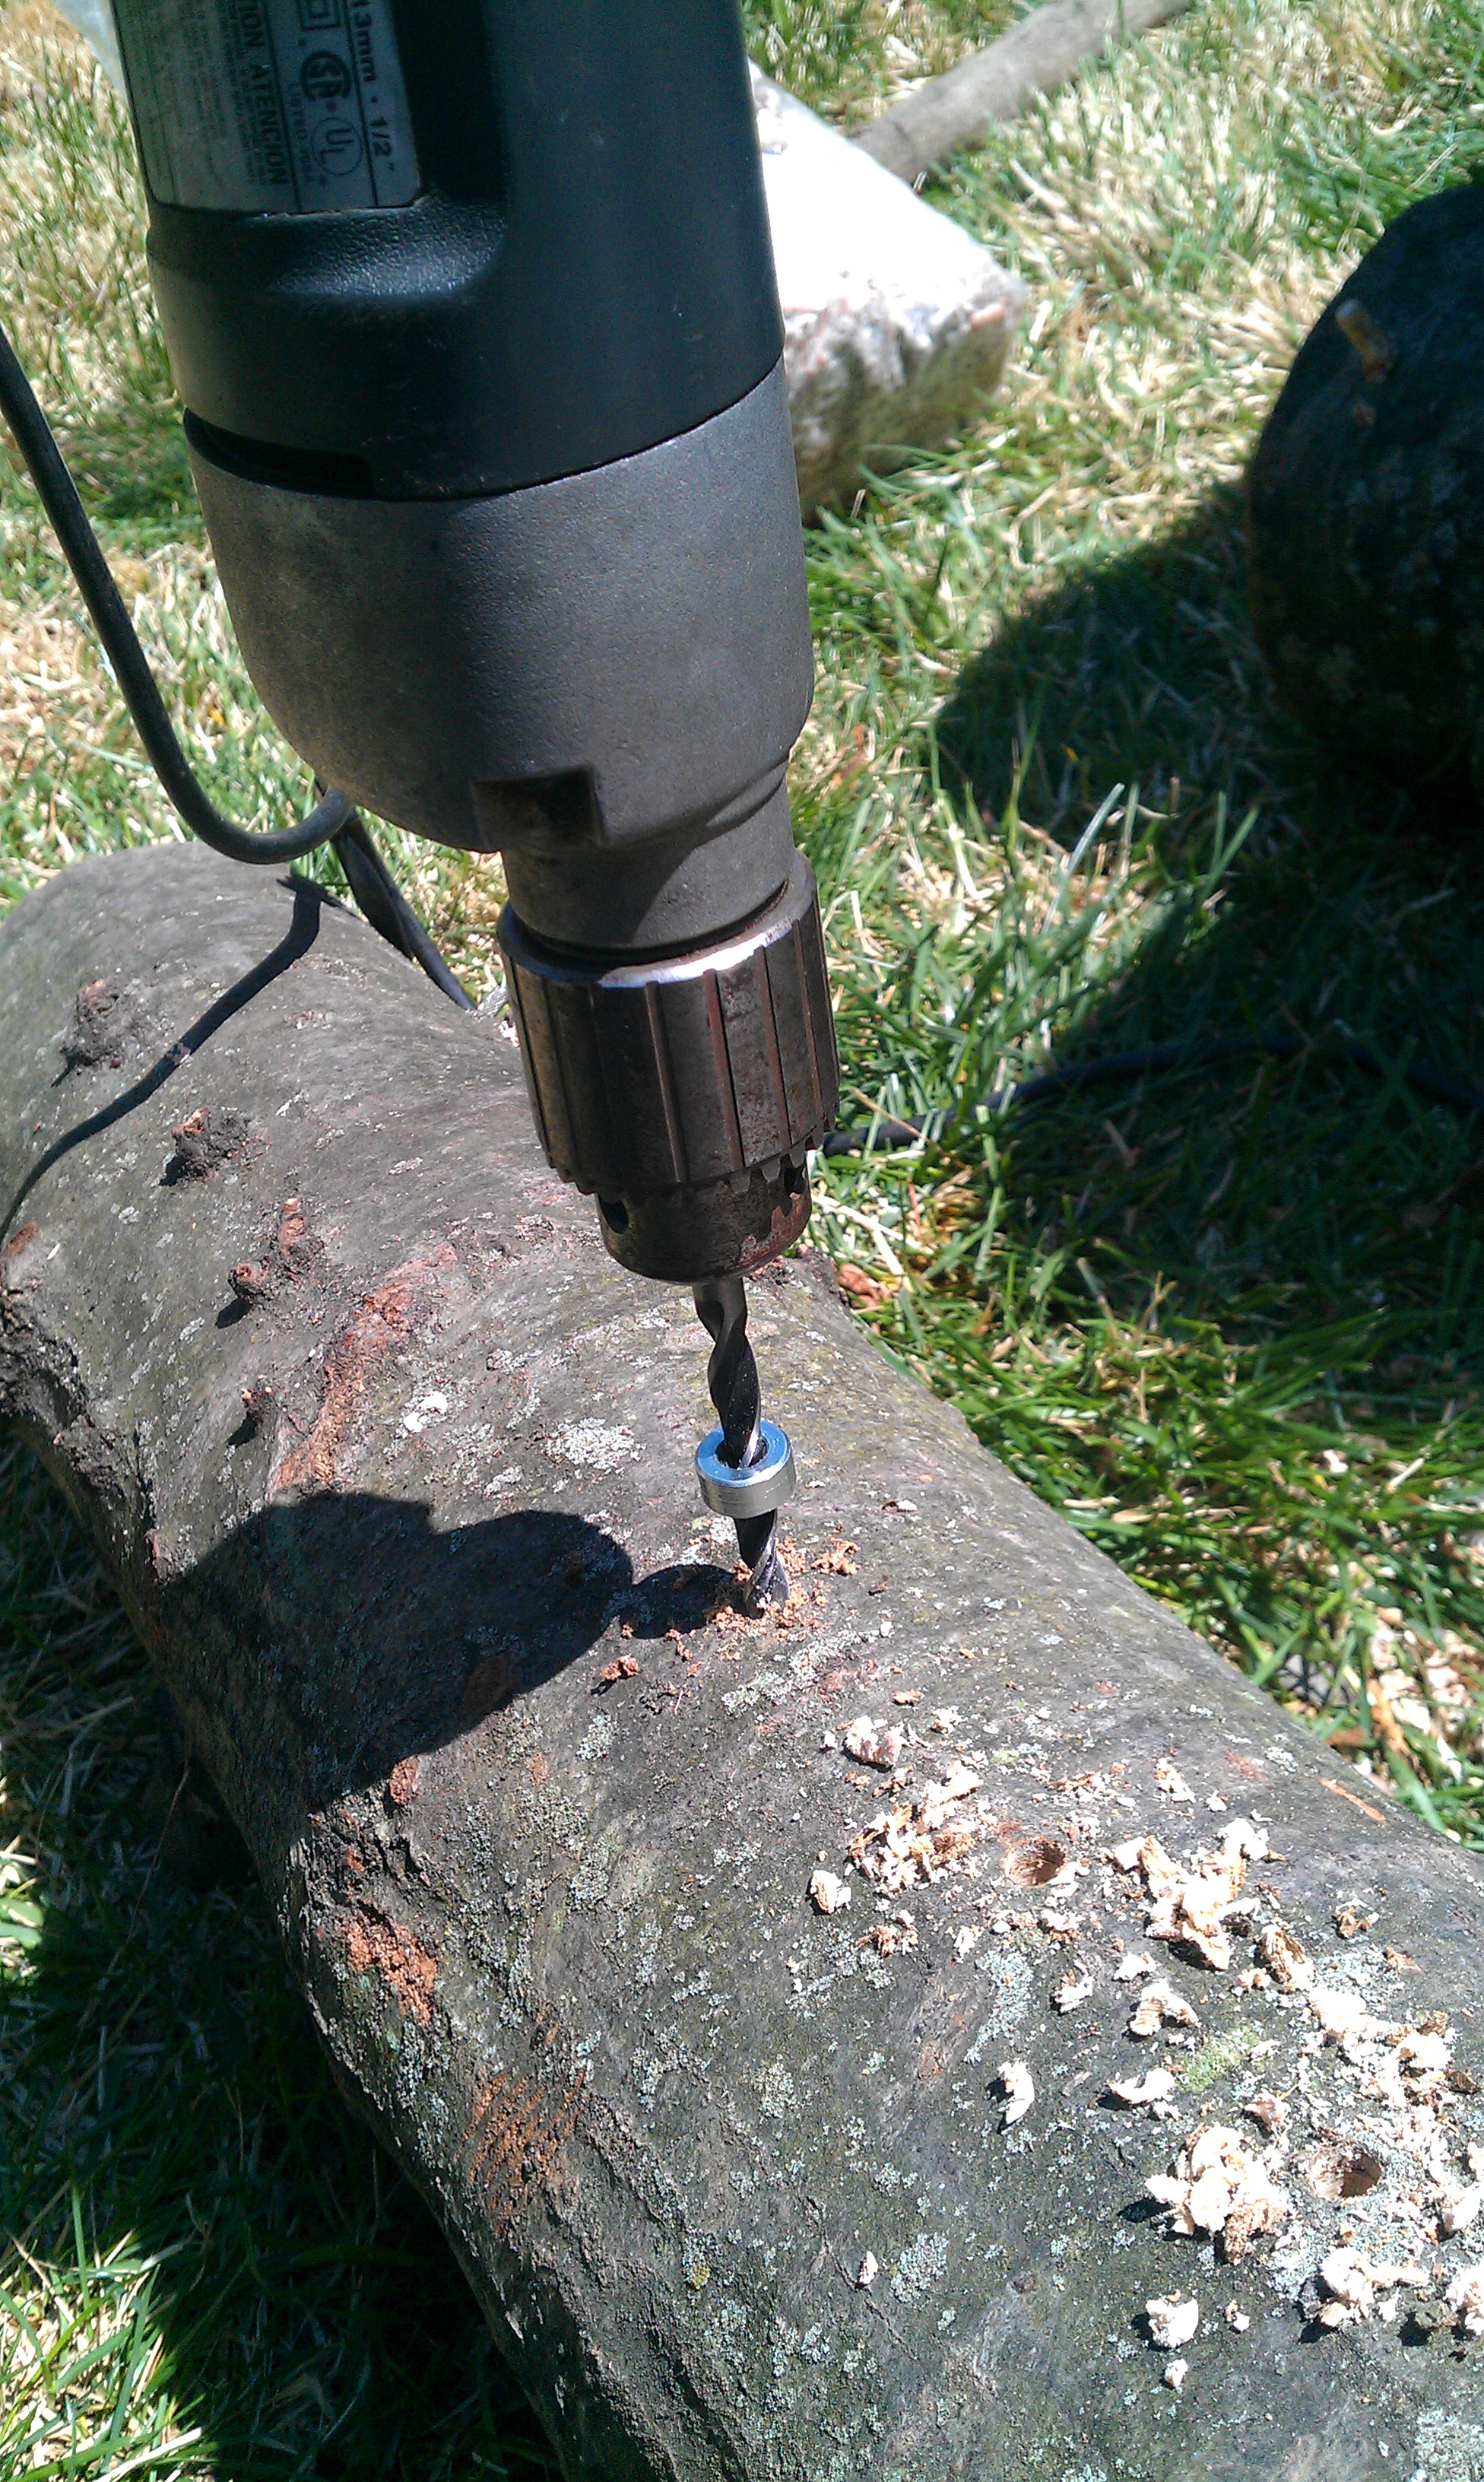
-use a drill bit that matches the size of your plug spawn. Most, including the ones we made for the workshop, are 5/16″ diameter and 1″ long, so you’d use a 5/16″ bit with a stop collar at 1″. Stop collars will really speed the process along if you’re doing more than a couple logs, and they’re super cheap.
-stick your plugs into the holes. I like doing two hole roles at a time. You can tap them each once if others are popping out while you’re driving them in.
-Use a rubber mallet and whack away til they’re driven all the way in. You can use a hammer, but use lighter whacks otherwise some will break. If they stick out a couple millimeters, that’s fine.
-Use a roughly 1″ paintbrush to coat each plug in wax. Wax the ends of the logs as well as this is the greatest entry point for foreign spores and exit point for water.
-Put your logs in a shady place accessible by water source. If you have only a few, you can lean them against a tree. The more vertical they are, the more the top will be drier than the bottom. You can always flip them over after a time to balance out the water level. If you have lots of logs, you can stack them in a lincoln log fashion. Some log-growers have moved away from this method recently because it’s harder to harvest mushrooms that have grown in the middle, so even with large amounts of logs, you can use the lean method.
-Be happy if weeds grows around them- this will increase humidity in their immediate environment.
-Water them occasionally so they stay more or less the same weight.
-When the log is completely colonized (meaning the cut-edges are mottled with darkened mycelium) consider giving the logs a good soak for 24-48 hours, no longer. This will compel the mycelium to start fruiting. If you don’t have a large basin to soak them in, just give them a good soak for a couple days with a hose. If weather is wet, this step is not necessary.
-Harvest your shitakes when they look like they do in the store. They will be tastier than the ones you get in the store, however.
-The smaller the diameter, the sooner you’ll have mushrooms. Expect fruits within 4 months to a year, depending on size, season, and weather. Your log should produce for a few years, depending on the same factors.
Oyster Kit:

-If you want to make your own oyster bag, you’re going to have to cut and pasteurize your straw. The best way to cut DIY-style is to run over it with a lawnmower once or twice (bagged). You want most of the straw to have been split lengthwise and average length 4″. This will help pack the straw in tighter and is ideal for mycelial growth. Pasteurize in a pillowcase or burlap bag etc. in a big pot full of water with a meat thermometer. Get it within the 150-160F range for an hour, ideally. Above 180 and you’re killing off the good bacteria. It helps to use strong gloves or a plate to compress the straw (don’t burn yourself) periodically while pasteurizing to distribute the hot water at the bottom throughout the straw and give you a better temperature reading. Move the meat thermometer around- the middle is what you want to get over 140 and the outer water will be hotter so it will tell you if you’re getting too hot. Keep in mind that the straw at the bottom is likely to be hotter. If you use a high spawn ratio, like 5:1, and the oyster strain is strong, you MIGHT be able to get away without pasteurizing, but be prepared for failure. Will save you serious time though. Just make sure the straw is soaked so it’s at the proper moisture level (moist but not more than a couple drips when you squeeze it)
-Once the straw is cool, mix it in with your spawn at a ratio of around 10:1. You can stretch this a bit, especially if you use millet. You can spread out your straw on a clean table and sprinkle the spawn on evenly, then pack your bag, or you can grab a few handfuls of straw at a time, add to the bag, and sprinkle a layer of spawn, massaging it lightly so some spawn falls down. Do this till the bag is full to under the filter-patch if using a spawn bag. You can compress the straw lightly to flatten out any pieces of straw that are sticking up.
-You don’t need to use a fancy spawn bag. Any bag that’s transparent and thick enough not to withstand pokey straw will work. Make sure it’s no thicker than 12″ otherwise the core may get too hot and increase chance of contamination. If you’re using a bag without a filter it’s VERY important to poke your holes immediately after filling it, otherwise the mycelium won’t be able to breathe.
-If you’re reading this today (4/26), your bag is probably just about ready for holes. Really, these can be poked anytime during colonization, but to minimize the potential for mold spores to get in, I’d advise waiting to poke till your bag is 50-75% colonized. Oyster mycelium is very aggressive, so even if you have some unwanted mold or bacteria in there, the mycelium very well may gobble it up. To poke your holes, use a sharp knife and cut 1/2″ “crosses” across the bag in around 5 locations. The cross design will allow the oyster bouquets to tear themselves a little extra space if necessary during fruiting.
-Allow the bags to colonize (a.k.a spawn run / incubation) at room temperature up to 75F. Colonization at a 10:1 spawn ratio, room temperature, should take no more than 2 weeks with this strong local strain, so you’ll probably be making your holes before day 7ish.
-Once fully colonized, you will probably notice some of the dense mycelium starting to poke out of the holes. This is where your mushrooms will begin to form.
-Here’s where some extra care comes in. If the room they’re growing in isn’t too dry, you can probably get away without providing a makeshift fruiting chamber, but done properly, a fruiting chamber will insure optimal results. The key to a fruiting chamber is letting air and light in while holding in some humidity. The easiest way to make a fruiting chamber is to punch some holes in a firm, transparent plastic bag that is at least 50% larger than the oyster bag. Thicker plastic will hold its shape better. Mist the inside of the bag and turn it upside-down and place it over the oyster bag, making sure there’s plenty of space between the bags at the crosses. Leave some areas at the bottom of the upturned bag with some clearance to allow air to flow. If you want some ideas for more legit-looking fruiting chambers, post a comment below.
-Oysters require more air exchange and light to fruit properly than other varieties. Give them plenty of indirect sunlight or use a natural (6500k) low-wattage flourescent bulb for 12 hours a day. Sunlight is cheaper!
-Misting is important to make sure the mycelium and forming mushrooms don’t dry out. Oysters can tolerate a great deal of direct misting, so mist the crosses, mist the mushrooms, and mist the inside of the bag whenever things look dry (no condensation inside the outer bag). Don’t waterlog the mushrooms themselves, but give them a few spritzes and they’ll thank you.
-Troubleshooting. If your mushrooms have long stems and small caps, you don’t have enough air exchange. If they’re small, the substrate may be too dry. If the caps are small and very pale, you don’t have enough light. It can take time to get all the factors right, so don’t be crestfallen if they don’t turn out beautiful the first time. However they look, they’ll still taste good!
-Harvesting. Oysters are known to drop a huge amount of spores. You want to pick your mushrooms before this happens to prevent serious sneezing as well as poorer taste and shelf-life. Mushrooms picked after spore-drop may only last 3 days in the fridge, while more immature ones can last well over a week! Oyster spores are whitish, so you’ll see them start to show up on the caps of the mushrooms directly under their gills. You may also see beautiful, tiny stalactites and stalagmites inside the outer bag. This means it’s high time to harvest. Harvest by twisting the mushrooms off, being sure to remove all mushroom tissue.
-You should be able to get three, maybe 4 flushes from the kit. If you only get two, don’t fret because you after the second flush, you’ve probably grown 80% of the mushrooms you would. Later flushes will have fewer but larger mushrooms
Storing mushrooms in the fridge. It’s best to keep them in paper bags so they can breathe a bit but not dry out.
If you have any more questions, post comments below!
 Sarah’s Hens, awaiting more shitake rye spawn! With a mushroom workshop, everyone wins

curious about the more legit looking fruiting chamber.
Sending a pic of my mushroom bed to facebook.
Cara
a more legit looking fruiting chamber for oysters would involve shelving, plastic sheeting, humidifiers, lights, zipper, and timers if you wanna be crazy legit and is probably not worth it for just a couple kits. Other varieties don’t require as much air exchange as oysters (oyster mycelium continues to produce lots of CO2 as it fruits) and can fruit OK in what’s referred to as a “shotgun fruiting chamber“
I have a concern about knowing when to harvest the Oyster shrooms. I know that you have to harvest before they drop spores but how do I know when “before they drop spores” is?
-Marge McCahon
Sorry didn’t get to this before, I hope you found an answer. The best method for determining the best time to pick short of building a time machine would be to reference store bought oysters. That way you can do a side-by-side taste comparison and feel even better about the local oysters you grew too.
Oh my! Yes MargeM., I harvested AFTER the dropped spores.. as they dusted the ‘top’ shelf where my kit lay.. it happened ‘over’ my nose, so to speak, lol! (such a DIY ‘schroomin’ newbie) .. Tyler, are the O’shrooms alright to eat if harvested late?!.. i nibbled and have them in the fridge. Tasted wonder-full and ‘am still alive! BTW, Thank You so so much for a fabulous workshop!! You are an amazing, articulate being. Would listen to you for eternity. Will expect to find you in person again real soon, as our time together was too brief.. i Must learn about keepin the ‘earthstar spores fed’.. which is something i have visioned to do; and indeed will seek to support the vision you describe-September ’12.
–Cara, will Love to see your accomplishment(s), my friend!
-Paula
Thanks Paula! That comment put an extra hop in my step which helped me traverse a puddle on my way to work. Yes if you’re oysters have already started dropping spores they should be fine to eat as long as there’s nothing funky going on (that would usually be a few days after dropping spores). When mushrooms drop their spores, the purpose of their fleeting existence has been realized and they can begin the process of becoming soil, so their shelf-life is significantly diminished. Also oysters drop so many spores that some of the mass of the fleshy delicious part is lost to spores. Nonetheless, if you keep them in the fridge and eat them within 2 days they will be just fine. Timing harvest can be really tricky, especially in warm weather when things can mature very quickly. Enjoy!
PS- if anyone has oyster pics I’d love to see em!
Thanks Tyler ~ i just put together an omlette with lemongrass and chives from my garden..Super Yummy!! ..i imagine they would be much more delicious earlier on! ..will send you some pics by email..
~ paula
Tyler, I got two large oyster “hands” that weighed 7 oz. total on my first fruiting. They were delicious! Now my oyster bag is resting in the basement again. How long should I wait before trying to coax a second fruiting?
Ken…
Glad you got such a nice harvest and that you enjoyed them! I love this local strain. If you leave the bag in fruiting conditions, it should fruit again when it’s ready. However, rehydrating the substrate can help this process along, especially if the exterior is dryer than when it started. I highly recommend that you “dunk” the block by submerging it in water (let the water sit out for a day so it loses chlorine) for 12-24 hours. Put a plate or something heavy on top so it stays submerged, and when you take it out make sure to pour off any water that’s settled in the bag. Is the block getting natural light? A basement window is a great place to grow mushrooms.
Oh yeah, to address your question- Oysters flush generally 2 weeks apart. You can dunk as soon as you harvest the first flush, but it’s never too late.
Pingback: Philly Oyster Kits | Chicken Mushrooms